Monday, December 27, 2010

Photo Tips: Lighting Reference

This post will share on how do i capture sun light, where do i place my flash light and how do i compose the photo.


1/200 sec, 85mm f1.4 @ f2.0, iso 200
the flash light is act as fill in light, the power have to same as sun light so it will not look too unnatural. How to adjust the flash light? Just use trial and error until u get!


1/250 sec, 17-50mm f2.8 @ f2.8, iso 200
this photo i have place the subject in the middle of two bushes, to create the front, middle and back layer.


1/250sec, 85mm f1.4 @ f.2.8, iso 200
the sun has been block by the bush, hence this time the flash light power is slightly higher. To remain two subject is clear, aperture may not be too large, so i stop down to f2.8 (watch out, aperture will affect flash light, smaller aperture need higher power).

I will share more reference from time to time, stay tune =)

Photo Tips: Composition

Composition is very important in photography, it is the way how the cameraman describe the subject through photo. Simple to say, is how the cameraman choose the angle to bring out the subject. Whenever you wanna take a photo, you have to know what is your subject. A good photo should have clear subject.

1. Keep the background clear- not messy, no eyesore, when people look at the photo, they will straight away focus on the subject.


2. Lighting- using light to bring out the subject, which the subject is brighter than the background or other object in the photo. this is very useful method!

subject is brighter than background


subject is brighter than another object which cameraman don't wan to describe.

3. Depth of field- also called as depth of focus, which is the area in a photo that is clear under focus point. Photo talk thousand of words, lets see photo below:


deeper depth of focus (focus point is on the lamp of black car)


shallow depth of focus (focus point is on the lamp of black car)

this method is to blur out other object(or messy background) that the cameraman don't want to describe, to bring out the subject. To create narrow depth of focus, there is several method. First is to open bigger aperture if your camera able to manually adjust aperture. Second is zoom to the far end of your camera lens to capture the subject. Third, choose an angle that your subject and other object is not parallel, either it is in front or back (not side by side).
e.g:


Lastly, where to "put" your subject in the photo? Normally people tend to place the subject in the center of photo. There is a rule, called Rule of Third suggest that you can place your subject in the one third area of the photo, rather than just center.

imaginary divided your photo into 3 equal area, either horizontal or vertical. See photo below:


However, rule of third suggest to place subject in one third area rather than just center, but doesn't mean you must follow this rule all the time, there is no fixed rule in art. =)

Tuesday, September 21, 2010

Photo Tips: Legend Of | Polypterus


Continue from the previous knowledge and experience about the aquarium photograph, today we add on some lighting effect. The flash light effect is concentrate the light on a small area to create a mystery atmosphere as you see in the photo. Normal flash light shooting degree is about 80+ degree, which is quite large coverage. To make the light stream concentrate, this actually very easy and simple. What you need to do is just wrap your flash gun's head with a thick paper, the function is same with you spend about hundred ringgit to buy a honeycomb snoot. After you wrap the flash gun, the dispersion degree has been narrow down to very low.


The light stream is narrow, hence you point into somewhere in the aquarium, and wait for your fish to pass through the area, and you capture it. If you feel frustrated waiting the fish to pass through your target area, you can get an assistant help you holding the flash light to aim on the fish. Well, you can try this lighting method on other field. Let try it out! =)

Thursday, July 22, 2010

Photo Tips: Aquarium photograph

Recently, i fall in love with fish, and taken several aquarium photograph. So, i would like to share some of my experience and what i had learned. The first thing i learn, is never NATO (no action talk only). I have found that, a lot of person will talk about CPL filter (kind of filter to reduce reflection of glasses) when they heard about aquarium photograph. Theoretically, aquarium will have reflection and CPL filter is needed. But, this is only theoretically, the fact is, not necessary. First of all, to avoid reflection of glasses, we just need to understand why there is a reflection. Simple reason, reflection occur when inner lighting is lower than outer. Same reason apply to building glasses and window, why we can't see through the window at day time, but can see through at night. Hence to avoid reflection, we just make the inner lighting higher than outer, just simple as that, we don't need CPL filter at all. We can switch off the lamp to lower down the environment light (outer), or increase the flash light power which the flash light is remove controlled, and place at the top of aquarium(inner). Build in flash is not able to reduce reflection.


01. If the inner lighting is lower, reflection will occur.


The next is about technical part. When taking aquarium photograph, try ur best to make ur object far from the aquarium glass which is close to ur camera, because we don expect the aquarium is crystal clear. If ur object is too close to the glass which is close to ur camera, u might capture some dust or scratch on the glass. (Refer to photo below)


02. Fingerprints on glass... =.=

Secondly, try to place ur camera 90degree to the glass. If ur camera is not 90degree to the glass, refraction will occur (refer to photo below). Hence ur image might be distorted, and ur camera might not able to focus well, or out of focus.


03. Refraction occur.

Lastly, apply what u have learn, heard, or read. Never NATO. Trust me, u will know more than what u known =)


04


05


06


07


08


09

Friday, July 9, 2010

Photo Tips: Why Portrait

I have been concentrate on portrait photography quite a long time, but i guess, not much people know why i concentrate on it, even some of them misunderstood the reason behind.

Well~ I seldom explain why. But since i have organize few times of model shooting activity and invited some of my friend to join, i hope they themselves understand why are they here, but not because of my invitation, not because of pretty girls =)

So, why portrait? the reason behind is a very subjective perspective, u not necessary agree on it. It is all about VALUE, the value added into my art & photography. Maybe when u capture a so called "meaningful" photo: a very upset old guy with lots of wrinkle on his face, smoking in a broken wooden house and a piece of old lady photo on the floor... Well~ this photo is great, u may win in a competition~ but do u think the old guy will appreciate what u have done? u make use of his bitter moment for your own art work, and u HAPPY with his SADNESS. Because of others sadness/bitterness = art or the so called meaningful photos, the great photographer of "The Starving of Sudan" has commit suicide. So, who appreciate your 'meaningful' photo?

So u see, the value added is, photo i have taken, there is someone appreciate. I capture their happiness, i capture their beauty, and important is, they happy with it. If i have capture for 1000 people, 1000 ppl appreciate my work, likewise, if u have capture 1000 of 'meaningful' photos, who else appreciate? Maybe only one person will appreciate, is you your self. A very simple example, if one day one of my portrait photo has been publish in a magazine, for sure the model of the photo will quickly buy the magazine, share with her friend and keep that magazine for life (perhaps.. haha), but if my "old guy" photo publish in the magazine.... well, will someone QUICKLY buy that magazine? share with friend? keep the magazine? will u?

I'm not a rich guy, and i have invest a lots of money into photography, so i think i must do something which is more valuable. At least I'm not 'syok sendiri' with the so call meaningful photo, but someone appreciate my work. That is the VALUE behind.

Others happiness, my art =)

Same reason, if there is any miss Malaysia competition, cat walk, bikini and what so ever, even though it is so call portrait as well, but i definitely won't go for that.


"The Starving of Sudan"
A very great photo that alert the world about the famine in Sudan, but the photographer commit suicide because of the pressure being blame by the world for not saving the girl. There is always a ethic conflict if others sadness/bitterness = art.

Saturday, May 15, 2010

Photo Tips: Star effect on Sun


I have heard some of people said that this photo has been edited due to the star effect and flare. Well, actually it is not. So, how do I make it?

First of all, you will need a better lens. The start effect is related to the number of aperture blade. Normally kit lens have only 6 blades, therefore you will only get 6 point star. However, if the number of blades is odd, then you will get double, e.g. 7 blades will get 14 point star. But why i said you will need a better lens? Because normally the edge of spike of 6 point star isn't sharp, and the length of spike is short, hence the effect is very very poor.

Second, you have to set to small aperture. For reference, photo above is f16.

Next, for easier to get the start effect on sun, you will need something to block on part of the sun, as the photo show above, the roof has block part of the sun, and the spike came out from where the sun has been blocked. So you got your star effect =)

However, it is possible to get full star effect on the sun.


To get full star effect on the sun, you have to close down the aperture to very small, and expose with a little under exposure, and the ground will definitely become dark. The photo show above is HDR image, that is why you can still see the clear ground. For reference, this photo has set to the lowest aperture of the lens which is f32. If you have a kit lens, you can still try it out =)

Monday, March 29, 2010

Photoshop Tips: Winter

Apologize for being late update, recently had busy bout exam, assignment, photo taking and a practical class.... =.=

Here is my first lesson about Photoshop technique. Due to request i will first show up how my way to adjust the color from green to white for imitation of winter season. I emphasize 'my way' because it is the way i explore myself, it may have lots of different way, or i would say maybe there is some 'efficient' way that i do not know, hence to declare that everyone can imitate my way but do not blame my 'stupig' way if someday you found the 'efficient' way~ =)


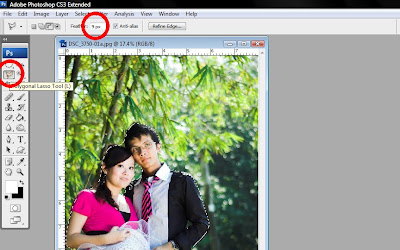
First open the photo that you want to edit, this is the sample. For beginner, choose a photo with most of green color in background (different color background may vary in adjustment). First, choose the polygonal lasso tool, and set the feather as 9 or 10(different image size may vary, smaller size may only need 2~3). After that using the polygonal lasso tool to select the figure of person. And then press ctrl + i to invert select. (click to see large image.)


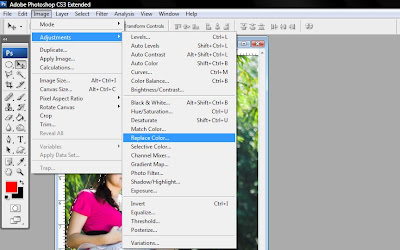
After finish select the figure, click on image > adjustment > replace color. (click to see large image.)


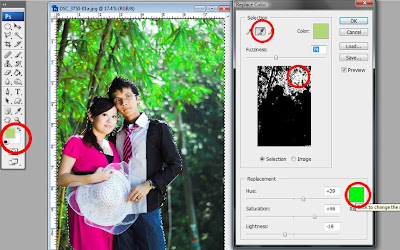
Make sure your front and background color is black and white. Then there is 3 tool in the replace color dialogue, choose the middle one. Click on the green color region in the small black and white image, and it will change to white. beware that, if the person (or object that you want to maintain original color) change to white, then you have to reselect. After that replace the color to light green(red circle).

Change the color to light green is because some of the 'green' color is not 'green enough', this step is easier for next step to change all green color to white. If skip this step, after finish adjustment there will be some 'green' color remaining.


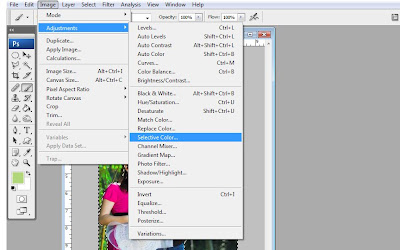
Now changing the color into white. Image > adjustment > selective color.


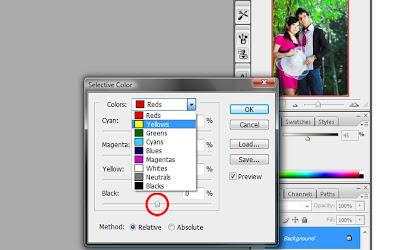
In the selective color dialogue, select yellow, and in the black column(red circle) set to -100%. Same step apply to green and cyan color. (click to see large image.)

Yellow, green and cyan is the color most exist in green background, or correct to say the background actually consist of yellow, green and cyan, but our eyes are not able to distinguish it clearly, and we will just simply define it as 'green'.


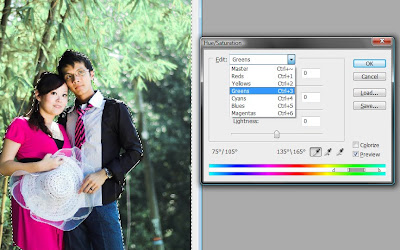
Now press the ctrl + u to adjust the hue/saturation. Select the green color and set the hue into +180 and saturation into -100. (click to see large image.)


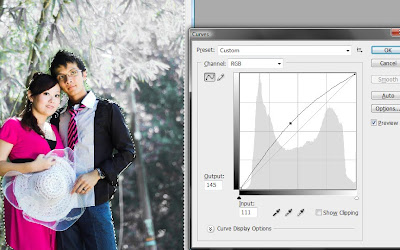
Finally, press ctrl + m to adjust the curve, which is to adjust the brightness. Drag the curve higher until the brightness that you desired. This step is to enhance the white color.


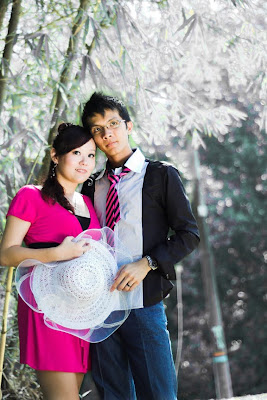
Final outcome. Due to sample adjust, the first step which selecting the figure of person i have simply did, hence there is some remaining green color near the figure. For your best outcome please do it seriously, =D

p/s : you can add some "white dot" to enhance the winter atmosphere.

Thursday, January 28, 2010

Photo Tips: Art of Light

I think most of the DSLR owner will know, or heard this sentence before, “photography is an art of light”. But I guess, especially for the beginner, they might not really understand, how important light is. Even thought, some of the beginner may never consider bout the existing of light, they may feel this angle is nice and just press down the shutter.
Correct lighting and exposure can create good contrast and saturated color of the object. So here is the reason why, beginner who would like to use Photoshop to adjust their photo, will normally adjust contrast and saturation. Photoshop is important in photography, or I may say image processing software is important, no doubt, its help a lot in photography, and we really need it, because this is DIGITAL PHOTOGRAPHY. But in my point of view, adjusting contrast and saturation in image processing software is not encouraged. We should make use of image processing software, but not this way, because we can have nicer contrast and saturation through a correct lighting and exposure.
So now is the problem, how are we going to know whether it is a correct lighting? Simple to say, a lighting which can create good contrast and saturated color is a good lighting. Here is an example, image A and image B.


Image A


Image B

Look at the grass, compare two image, definitely image B has higher contrast. So u get it? =)

Saturday, January 9, 2010

Photo Sharing: Zoo

This series of photo i have taken long time ago, and even i have sold off the tele-lens, but this is a good series of photo, for me. Well, i would like to share some tips for zoo photograph here. First of all, tripod is a must for zoo photograph, you won't regret with that. It definitely help to create a sharper image and more stable during capture even though some situation you can hand held. Next is, avoid to capture human-made stuff such as gate, wall, and fencing. This is to create a more nature feel, make it look like a wild life animals.


00


01


02


03


04


05


06


07


08


09


10


11


12