Friday, August 26, 2011

Photo Tips: How to learn photography


How to learn photography?

This is a question that i often been asked. Normally, what i see how people learn is, they bring their camera out, shooting here and there, go back home post on internet and ask for comment. So, is this the efficient way to learn? Now put this aside, lets find out what is the basic of learning process.

Look back when you were child, how do you learn to talk? How do you learn to write? You learn to talk by speak after your parent; you learn to write by your parent holding your hand to write, right?

When your were school, you did what kind of science experiments? you did what kind of mathematics equations? you did a science experiment that someone solved before; you did a mathematics equation that have a solution, isn't it?

All of these learning process, they have one common characteristic, do you notice what is it?

It is IMITATION. you imitate your parent voice, you imitate your parent hand writing, you imitate scientist's experiments and mathematics equations, all you do is imitating! Lets imagine, when you were school will you do an experiment that scientist never do before??? No! Because this is not an efficient learning process, right? So this is just about the same that you bring a camera out and shoot here and there blindly.

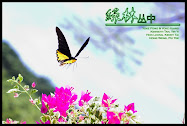
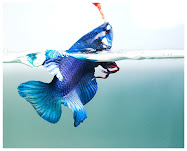
To learn photography, we should not ignore the basic of learning, imitation. What i suggest is, go and collect the experts' photos, find out what make this photo special. lighting? composition? timing? equipment? or even setting? Whatsoever. If you are unable to identify, ask your experienced friend to identify, and the next time you met the similar situation or go find out the similar situation, imitate it! Why imitation work better? because you have a clear direction, you are not doing an experiment that no one do before. After imitation, you modify; after modify, you create. This is the learning process.

Lets see the power of imitation. Nowadays, every internet user know to use the symbol =.=!!!. But can you define =.=!!! ? When i say define, it mean someone that don't know what is =.=!!!, he will know to use it after read your definition, e.g. your grandpa. Can you do it? i believe most of people are not able to define. They don't know how to explain, but what funny is they know to use it! Funny right? Yeah, this is the power of imitation!

I can't explain how exactly to take a good photo. Rules of third? golden spiral? golden triangle? lighting? and you said "i have did that all and why my photo is not good?" Go and imitate, and one day you will surprise that you are not imitate any more, and you take good photo. This is what we call art sense! :-)

Photo Tips: Lighting Reference

1/500 sec, 17-50mm f 2.8@f 7.1, iso 200
This lighting set up is make a brighter outline, hence the power of strobe light 2 hv to set higher than 1(this is also depends on the distance btw the light and model, light closer will be brighter.). In this sample photo i din't use the two boards that block the strobe light 2 because of the limited space. The board is to block away unnecessary lighting from strobe light 2, because purpose of strobe light 2 is only to expose model's outline, not her face. Bring out the outline of model can create beautiful tone on model's skin, and it also allow black shirt with black background.

1/400 sec, 17-50mm f 2.8@f 6.3, iso 400
for this lighting set up, what u need is a honeycromb snoot or just DIY as what i shown in previous aquarium shooting.


1/320 sec, 85mm f 1.4@f2.8, iso 200

Thursday, February 3, 2011

Photo Tips: Lighting Reference


1/640 sec, 17-50mm f2.8 @ f5.6, iso 200
it is a cloudy day, and i use stronger flash power to push down the sunlight to make the background slightly under exposure to create mystery atmosphere.


1/200 sec, 17-50mm f2.8 @ f8, iso200
fill in flash light at left hand side to compensate the exposure which sunlight cannot cover.


1/80 sec, 17-50 f2.8 @ f4.5, iso 320
it's cloudy day, however the subject is under a kiosk and the surface of lake is reflecting light, hence the exposure is not balance. flash light fill in to compensate the exposure.

Photoshop Tips: Film Effect

Digital SLR is flooded in the city nowaday, then there is some ppl start to thinking bout film slr. However, not everyone dare to step into film world. So, now photoshop can help u to create a fake film photo by few click =)


select gradient map. (click to see large image)


double click on the color bar, the gradient editor window will pop out, and then select the blue, red, yellow preset gradient. (click to see large image)


change the color bar into orange, blue, red and yellow, then click on ok. (click to see large image)


change the opacity into 10%. (click to see large image)


change the saturation into -20. (click to see large image)


at the layer side, select the background. and then click on filter > noise > add noise. (click to see large image)


set the amount as 5%, done. (click to see large image)

Monday, December 27, 2010

Photo Tips: Lighting Reference

This post will share on how do i capture sun light, where do i place my flash light and how do i compose the photo.


1/200 sec, 85mm f1.4 @ f2.0, iso 200
the flash light is act as fill in light, the power have to same as sun light so it will not look too unnatural. How to adjust the flash light? Just use trial and error until u get!


1/250 sec, 17-50mm f2.8 @ f2.8, iso 200
this photo i have place the subject in the middle of two bushes, to create the front, middle and back layer.


1/250sec, 85mm f1.4 @ f.2.8, iso 200
the sun has been block by the bush, hence this time the flash light power is slightly higher. To remain two subject is clear, aperture may not be too large, so i stop down to f2.8 (watch out, aperture will affect flash light, smaller aperture need higher power).

I will share more reference from time to time, stay tune =)

Photo Tips: Composition

Composition is very important in photography, it is the way how the cameraman describe the subject through photo. Simple to say, is how the cameraman choose the angle to bring out the subject. Whenever you wanna take a photo, you have to know what is your subject. A good photo should have clear subject.

1. Keep the background clear- not messy, no eyesore, when people look at the photo, they will straight away focus on the subject.


2. Lighting- using light to bring out the subject, which the subject is brighter than the background or other object in the photo. this is very useful method!

subject is brighter than background


subject is brighter than another object which cameraman don't wan to describe.

3. Depth of field- also called as depth of focus, which is the area in a photo that is clear under focus point. Photo talk thousand of words, lets see photo below:


deeper depth of focus (focus point is on the lamp of black car)


shallow depth of focus (focus point is on the lamp of black car)

this method is to blur out other object(or messy background) that the cameraman don't want to describe, to bring out the subject. To create narrow depth of focus, there is several method. First is to open bigger aperture if your camera able to manually adjust aperture. Second is zoom to the far end of your camera lens to capture the subject. Third, choose an angle that your subject and other object is not parallel, either it is in front or back (not side by side).
e.g:


Lastly, where to "put" your subject in the photo? Normally people tend to place the subject in the center of photo. There is a rule, called Rule of Third suggest that you can place your subject in the one third area of the photo, rather than just center.

imaginary divided your photo into 3 equal area, either horizontal or vertical. See photo below:


However, rule of third suggest to place subject in one third area rather than just center, but doesn't mean you must follow this rule all the time, there is no fixed rule in art. =)

Tuesday, September 21, 2010

Photo Tips: Legend Of | Polypterus


Continue from the previous knowledge and experience about the aquarium photograph, today we add on some lighting effect. The flash light effect is concentrate the light on a small area to create a mystery atmosphere as you see in the photo. Normal flash light shooting degree is about 80+ degree, which is quite large coverage. To make the light stream concentrate, this actually very easy and simple. What you need to do is just wrap your flash gun's head with a thick paper, the function is same with you spend about hundred ringgit to buy a honeycomb snoot. After you wrap the flash gun, the dispersion degree has been narrow down to very low.


The light stream is narrow, hence you point into somewhere in the aquarium, and wait for your fish to pass through the area, and you capture it. If you feel frustrated waiting the fish to pass through your target area, you can get an assistant help you holding the flash light to aim on the fish. Well, you can try this lighting method on other field. Let try it out! =)