Monday, March 29, 2010

Photoshop Tips: Winter

Apologize for being late update, recently had busy bout exam, assignment, photo taking and a practical class.... =.=

Here is my first lesson about Photoshop technique. Due to request i will first show up how my way to adjust the color from green to white for imitation of winter season. I emphasize 'my way' because it is the way i explore myself, it may have lots of different way, or i would say maybe there is some 'efficient' way that i do not know, hence to declare that everyone can imitate my way but do not blame my 'stupig' way if someday you found the 'efficient' way~ =)


First open the photo that you want to edit, this is the sample. For beginner, choose a photo with most of green color in background (different color background may vary in adjustment). First, choose the polygonal lasso tool, and set the feather as 9 or 10(different image size may vary, smaller size may only need 2~3). After that using the polygonal lasso tool to select the figure of person. And then press ctrl + i to invert select. (click to see large image.)


After finish select the figure, click on image > adjustment > replace color. (click to see large image.)


Make sure your front and background color is black and white. Then there is 3 tool in the replace color dialogue, choose the middle one. Click on the green color region in the small black and white image, and it will change to white. beware that, if the person (or object that you want to maintain original color) change to white, then you have to reselect. After that replace the color to light green(red circle).

Change the color to light green is because some of the 'green' color is not 'green enough', this step is easier for next step to change all green color to white. If skip this step, after finish adjustment there will be some 'green' color remaining.


Now changing the color into white. Image > adjustment > selective color.


In the selective color dialogue, select yellow, and in the black column(red circle) set to -100%. Same step apply to green and cyan color. (click to see large image.)

Yellow, green and cyan is the color most exist in green background, or correct to say the background actually consist of yellow, green and cyan, but our eyes are not able to distinguish it clearly, and we will just simply define it as 'green'.


Now press the ctrl + u to adjust the hue/saturation. Select the green color and set the hue into +180 and saturation into -100. (click to see large image.)


Finally, press ctrl + m to adjust the curve, which is to adjust the brightness. Drag the curve higher until the brightness that you desired. This step is to enhance the white color.
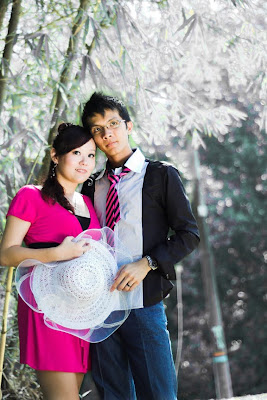


Final outcome. Due to sample adjust, the first step which selecting the figure of person i have simply did, hence there is some remaining green color near the figure. For your best outcome please do it seriously, =D

p/s : you can add some "white dot" to enhance the winter atmosphere.
Thursday, January 28, 2010

Photo Tips: Art of Light

I think most of the DSLR owner will know, or heard this sentence before, “photography is an art of light”. But I guess, especially for the beginner, they might not really understand, how important light is. Even thought, some of the beginner may never consider bout the existing of light, they may feel this angle is nice and just press down the shutter.
Correct lighting and exposure can create good contrast and saturated color of the object. So here is the reason why, beginner who would like to use Photoshop to adjust their photo, will normally adjust contrast and saturation. Photoshop is important in photography, or I may say image processing software is important, no doubt, its help a lot in photography, and we really need it, because this is DIGITAL PHOTOGRAPHY. But in my point of view, adjusting contrast and saturation in image processing software is not encouraged. We should make use of image processing software, but not this way, because we can have nicer contrast and saturation through a correct lighting and exposure.
So now is the problem, how are we going to know whether it is a correct lighting? Simple to say, a lighting which can create good contrast and saturated color is a good lighting. Here is an example, image A and image B.


Image A


Image B

Look at the grass, compare two image, definitely image B has higher contrast. So u get it? =)

Saturday, January 9, 2010

Photo Sharing: Zoo

This series of photo i have taken long time ago, and even i have sold off the tele-lens, but this is a good series of photo, for me. Well, i would like to share some tips for zoo photograph here. First of all, tripod is a must for zoo photograph, you won't regret with that. It definitely help to create a sharper image and more stable during capture even though some situation you can hand held. Next is, avoid to capture human-made stuff such as gate, wall, and fencing. This is to create a more nature feel, make it look like a wild life animals.


00


01


02


03


04


05


06


07


08


09


10


11


12

Photo Tips: Pixel

Many people do not really understand about how pixels work, and blindly chasing for higher camera pixel. First of all, what is pixel? Pixel is the smallest image-forming unit of an image or video display. In a simpler word, every digital image is formed by many dots, and these dots are called pixel. An image with one mega pixels mean the image is formed by 1,000,000 dots.

For printing, a standard printing resolution is 300 dots per inch (dpi). Which mean the printer print a photo with 300 dots (pixel) every inch. A 4R photo is 4 inch x 6 inch, therefore a total pixel of 4R photo is (300 x 4) x (300 x 6) which equal to 2,160 000 pixel, 2 mega pixel. So, here you see, are you often printing your photo? Or, are you going to print larger than 4R? So why are you keep chasing for higher camera pixel?

If your answer is yes, you are going to print larger than 4R, and then I will recommend you a DSLR with a proper lens.

No doubt, higher pixels allow for larger printing, but it is just one of the conditions for larger printing, there is still other important condition. What is it? The answer is the lens resolution and sensor size. Basically, larger the sensor size, higher the image quality (definitely DSLR sensor size is larger than compact camera), and the lens resolution are depends.
Here is an example. Image A was capture by a 6 mega pixel DLSR with a high resolution lens; where else image B was capture by a 15 mega pixel DLSR with low resolution lens.


Image A: 6MP, high resolution lens.


Image B: 15MP, low resolution lens.

Maybe in this kind of size, your eyes could not make any differences, but after it has enlarged 100%, you will see this.


Image A: 6MP, high resolution lens.


Image B: 15MP, low resolution lens.

So now u judge, which photo can be enlarge better?
If your camera has a finger nail size of lens and sensor, 1 tera-pixel is a useless. Pixel does not make your image sharper, nicer or more beautiful, it only allow larger printing.
So stop blindly chasing for higher pixel :)